Neovolt via Modbus RTU (RS-485)
This guide describes step by step how to connect a Neovolt battery system to the Currentt Navigator via Modbus RTU over RS-485.
See also: For connection via the network (Modbus TCP), see the guide Neovolt Modbus TCP.
✅ Compatible models
| Model | Power |
|---|---|
| BW-INV-SPH5K + BW-BAT-10.1P | 5 kW |
| BW-INV-SPH3.6K + BW-BAT-10.1P | 3.6 kW |
| BW-INV-SPB5K + BW-BAT-10.1P | 5 kW (AC-coupled) |
| BW-INV-TPH10K + BW-BAT-4.8S | 10 kW (three-phase) |
🧰 Requirements
- Currentt Navigator Pro (with RS-485 Modbus connection)
- RS-485 cable with RJ45 connector (CAT5)
1️⃣ Step 1: Install the Neovolt
- Install the Neovolt according to the supplied installation manual
- Ensure the system is powered on and functioning correctly
2️⃣ Step 2: Connect RS-485 cable
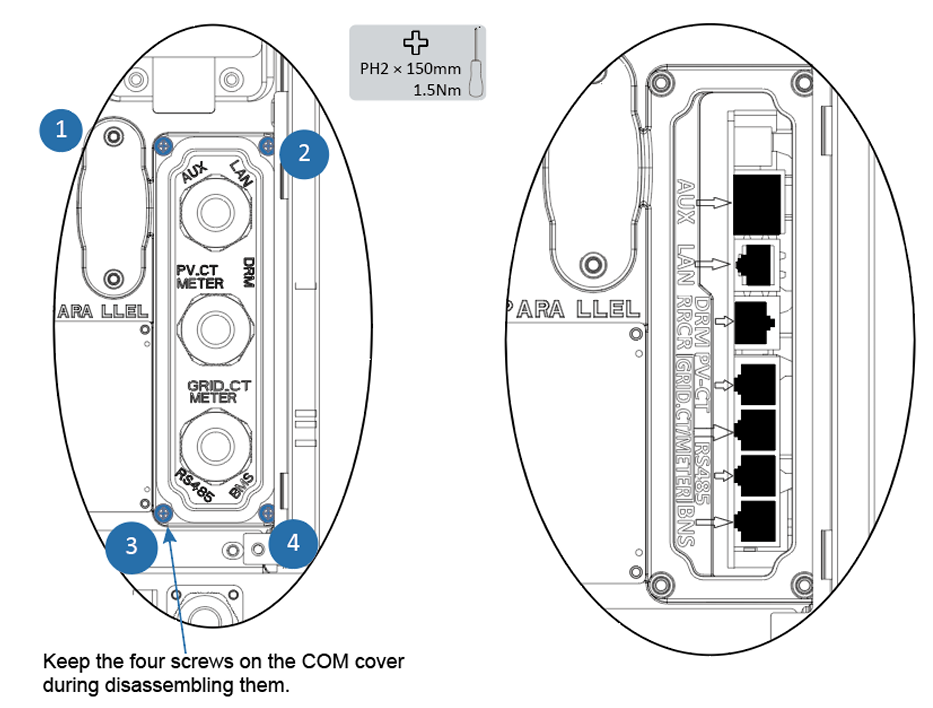
- Loosen the swivel nuts on the cable glands of the COM connection cover
- Remove the 4 screws from the COM connection cover (PH2, 1.5 Nm)
- Lead the communication cable through the cable gland (do not tighten the swivel nut yet)
- Connect a CAT5 cable with RJ45 connector to the RS485 port on the inverter
- Connect the other end to the RS-485 Modbus connection on the Currentt Navigator
- Place the COM connection cover back and tighten the 4 screws
- Tighten the swivel nut of the cable gland
RS485 port pin definition (RJ45)

The RS485 port uses an RJ45 connector (T568B). Only pins 4 and 5 are used:
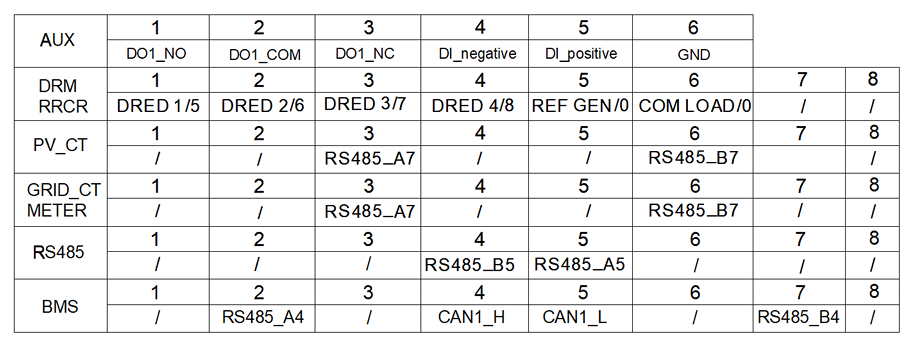
| Pin | Function |
|---|---|
| 1 | — |
| 2 | — |
| 3 | — |
| 4 | RS485_B (Data −) |
| 5 | RS485_A (Data +) |
| 6 | — |
| 7 | — |
| 8 | — |
Ground connection
Connect the ground (GND) on one side only: either to the Currentt Navigator or to the device — but never on both sides. Connecting ground on both sides can cause a ground loop, leading to communication errors.
3️⃣ Step 3: Enable Modbus on the inverter
Modbus must be manually enabled via the LCD display on the inverter.
- Navigate on the display to Function
- Enter the installer password: 1111
- Go to ModBus
- Set Modbus enable to YES
- Confirm the setting
4️⃣ Step 4: Configuration in the Currentt Navigator
After connecting and configuring the inverter, the battery must be added in the Currentt Navigator.
Via the Setup Wizard (recommended)
- Click the settings icon (top right of the screen)
- Choose Setup Wizard
- Follow the on-screen steps
Manual configuration
- Click the settings icon (top right of the screen)
- Go to Components
- Click the + button in the Batteries section
- Select Neovolt
- Enter the connection details:
| Parameter | Value |
|---|---|
| Connection | Modbus RTU (RS-485) |
| Modbus address | 85 (default) |
| Baud rate | 9600 |
| Data bits | 8 |
| Parity | None (N / disabled) |
📋 Settings summary
| Parameter | Value |
|---|---|
| Connection | RS-485 (Modbus RTU) |
| Protocol | Modbus RTU |
| Connector | RJ45 |
| Modbus address | 85 (default) |
| Baud rate | 9600 |
| Data bits | 8 |
| Parity | None (N / disabled) |
🛟 Troubleshooting
| Problem | Possible cause | Solution |
|---|---|---|
| No connection | Modbus not enabled | Check that Modbus enable is set to YES via the LCD display |
| No connection | Wrong wiring | Check the RS-485 cable and RJ45 connection |
| No connection | Wrong Modbus address or baud rate | Check that the Modbus address is set to 85 and the baud rate to 9600 |
| Battery not responding | System not powered on | Check that the Neovolt is powered on and operational |